At some point or other you're likely going to want to change the size of a digital photo. This will usually be to serve an intended purpose such as emailing a smaller sized version of your original photo. In most instances you will be reducing the size of the image. Several topics are discussed on this page including enlarging photos, reducing digital photos, the aspect ratio of digital photos, cropping digital photos and emailing digital photos.
Original Photos
Your original digital photos, whether they be from your digital camera or from a scanner are your "negatives" and should never be touched. Keep them in a safe place and always work on copies of your originals. See the Storage Page for details about how to properly save and archive your originals.
Enlarging Digital Photos
Digital photos do not take well to being overly enlarged and this is generally to be avoided. If you want to print an image it is usually best to first try printing using the original size and quality of your digital photo. Your printer software will make the adjustments.
If you really want to digitally enlarge a digital image then the best bet is to either use proven workflow routines to optimize enlarging or get software specifically designed for this purpose (i.e. Topaz Gigapixel which is purposed designed to upscale digital images). If you are using a program such as Adobe Photoshop, the "quick & dirty" way to do a reasonable digital enlargement results is by doing the enlargement in increments of 10%. Keep doing 10% enlargements until the distortion that results becomes too great for you and then step back one step and save the resulting enlarged image. There are much better, but more complicated Photoshop techniques. An excellent one can be found on Digital Outback. For others, do an Internet search for "Upsizing Digital Images" and "Enlarging Digital Images."
Reducing Digital Photos
The most common size adjustment for a digital photo is to reduce its size, either for a specific purpose (i.e. emailing, posting to a website) or to crop the photo. Specifics regarding cropping and size reduction for emailing are in the two sections following this one.
One note is that after a digital photo has been resized, it will need to be re-sharpened. Sharpening comes in many flavours and sometimes it can be a bit hard to find in a program. For instance, in Adobe PhotoShop (CS or Elements), the most effective sharpening tool is the "Unsharp Mask" that you will find under the "Filter" menu using the "Sharpen" option. In IrfanView it is under the "Image" menu but for greatest control you'll have to open the "Effect" option and choose "Effects Browser" in order to visually control the amount of sharpening. In Breezebrowser it is part of the "Proofs" dialog box and uses settings similar to Adobe PhotoShop's "unsharp mask". There is a whole science to doing high quality sharpening, do an Internet search for "Sharpening Digital Images."
Aspect Ratio of a Photo
The aspect ratio of a photo is the ratio of the width of a photo compared to the height of the photo. For instance, a square photo would have a 1:1 aspect ratio (width is the same as the height). Conventional 35mm film has a 1.5:1 aspect ratio (or 3:2 as expressed in whole number terms). Many "point & shoot" digital cameras produce photos with a 1.33:1 (4:3) aspect ratio while most digital SLR cameras generally use the 35mm 1.5:1 aspect ratio. Some cameras allow you to choose the aspect ratio of the photos it takes. You can determine the aspect ratio of your digital images by looking at the pixel dimensions. A photo with dimensions of 2048 x 1536 pixels would have an aspect ratio of 1.33:1 (length divided by width). A photo with dimensions of 3504 x 2336 pixels has an aspect ration of 1.5:1.
The problem people run into is with printing since the aspect ratio of the printing paper doesn't always match the aspect ratio of the photo. Common photo paper sizes in North America include 6" x 4" (1.5:1 aspect ratio), 7" x 5" (1.4:1), 10" x 8" (1.25:1) and 11" x 8.5" (1.29:1). You'll note that all these paper sizes have different aspect ratios and only one matches a common digital photo size aspect ratio.
To print your photos to a paper size that has a different aspect ratio, you'll either end up bordering the photo to match the aspect ratio of the paper, or cropping the photo.
If you simply give your photo to a commercial printer, it will most likely either be automatically bordered or automatically cropped (some printers do offer a manual cropping service). Problems can crop up (so to speak) with automatic cropping. If you have people objects going from edge to edge, they can get chopped off during cropping. A beautifully composed shot can be ruined by bad cropping. So, it is best if you can do your own cropping to send an image that will exactly match the aspect ratio of the paper you intend to have it printed on.
You may also want to do cropping for a slide show destined to be shown on a TV or computer monitor. Older TVs generally have an aspect ratio of 1.33:1 (4:3) while today's HD, 4K, etc. TVs and monitors often have an aspect ratio of 1.78:1 (16:9). If you know what kind of TV/monitor the slide show is to be played on (i.e. HD) then you can crop the images to match that ratio, allowing them to be shown full screen, with no borders.
Cropping Digital Photos
A common size change for a digital photo is cropping. This can be done to either simply change the aspect ratio of a photo (as discussed above), recompose the photo (change the apparent balance of objects in the photo) or "zoom in" on a section of the photo (create a new photo of just a portion of the original photo). The latter two objectives of cropping are often one and the same.
| |
 |
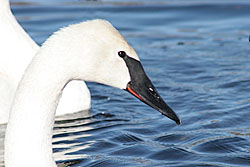 |
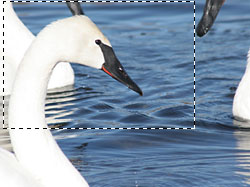
Top: original photo with a 1.33:1 aspect ratio. Cropping marquee is shown
Bottom: Cropped to a 1.5:1 aspect ratio |
Cropping involves selecting a portion of the image and removing the rest. This creates a new smaller image with just the portion of the image that you want. Cropping can be used to remove annoyances in the photo, to "zoom-in" on a selected portion of the photo, or to change the aspect ratio of the photo so that it can be printed full frame on a selected paper size (or viewed with no bordering on a monitor/TV).
In the example on the right, the photo is being cropped both to enlarge a portion of the image and also recompose the image (cropping to remove a couple of unwanted elements and changing the "balance" of the photo). It is also being cropped to a different aspect ratio (changing from a 1.33:1 (4:3) ratio to a 1.5:1 (3:2) ratio.
Most good photo programs have a cropping tool. In Photoshop Elements for instance you would use the "Rectangular Marquee Tool" to select an area of the photo. Note that this tool can be set to be a fixed aspect ratio (i.e. 3:2). A quick shortcut if cropping to a certain paper size aspect ratio is to simply enter the paper size as the aspect ratio (i.e. 8.5:11).
Once you've selected exactly what you want, you would use the "Image > Crop" function to produce an image with only the selected portion of the photo with the aspect ratio of the paper you intent to print the photo onto.
Many photo printers come with software that allow the easy printing of photos and include a built in cropping tool (whose aspect ratio will match the paper size you have chosen), allowing you to crop the photo to the desired printing size.
Emailing Photos
One of my pet peeves is digital photo bloat and this is especially true when it comes to emailing photos. There is no point in sending "just to see" photos of a larger viewing size than a normal computer screen - it's just annoying. Plus it adds to email bloat to have file sizes ten times bigger than they need to be (6 Mb vs 600 kb). These images should be reduced in both pixel dimensions and computer file size. Some of you will have software that came with your camera that will automatically do this for you. Others will have to rely on separate photo software. My recommendation for emailing size is a photo with a horizontal dimension of about 1280 pixels and a JPEG quality of about 60. My favourite program to change the size of digital photos for emailing is Breezebrowser (super fast and easy), but I'll outline procedure for Windows, Adobe Photoshop and Irfanview as well:
Windows (any version, XP to 11)
Microsoft doesn't do digital photos well. The poorly performing and feature lacking Photos in Windows 10 is an example (my recommendation, don't use it). So there are no useful photo tools that come with Windows, including no native way of easily re-sizing photos for emailing. There used to be a free Windows addition that could do it (Powertoy Resizer), but Microsoft discontinued it and independent developers that continued it for a few years stopped making it available (in 2018).
So you'll have to use a separate software solution rather than a native Windows solution.
Adobe Photoshop Method
 |
| note that both the "Resample Image" and the "Constrain Proportions" boxes are CHECKED and that the WIDTH box in the Pixel Dimensions section has been set to 1280 (the program will automatically set the height). |
- Load a copy of your photo into Adobe Photoshop (or Photoshop Elements).
- Select the "Image > Image Size" menu option (may be "Image > Resize > Image Size" in Photoshop Elements).
- In the image size dialog window, make sure that the "Resample Image" and the "Constrain Proportions" checkboxes are selected (checked).
- In "Pixel Dimensions" section type in 1280 in the Width box (assuming that the image you are working with has a width greater than 1280
- Click the "OK" button - Sharpen the image if required
- Your photo will be resampled using its original aspect ratio (which is what Adobe means by the obtuse "Constrain Proportions").
- Use "Save As" to save this photo in JPEG format with a new name - I suggest adding a -email extender (i.e. "345-2365-email.jpg"). Click "OK"
- The next dialog box are your JPEG options, choose Quality 5 or 6.
Current versions of Photoshop have a "Save to Web" which can do the above in a single process and make a smaller file to boot. If you have this option use it. It will allow you to change the image size and select your JPEG compression in one step. Note though that "Save to Web" will strip out any IPTC data you have in the image.
Irfanview Method
- Load a copy of your photo into Irfanview
- Select the "Image > Resize/Resample" option
- In that dialog window make sure that "Preserve Aspect Ratio" is selected
- In the "Set New Size" section, make sure that "pixels" are selected and input 1280 for width
- Click on the "OK" button. Sharpen the image if required.
- Use "Save As" to save this photo in JPEG format with a new name - I suggest adding a -email extender (i.e. "345-2365-email.jpg"). In the flyout box select 50 as the quality
You can also change the size of multi photos using the Batch Conversion routine in Irfanview (also accessible from the thumbnail view).
Breezebrowser Method
- View your photo directory with Breezebrowser (thumbnail images)
- Select all the images you want to change
- Under the "Tools" menu select "Proofs"
- Make sure that "Resize" image is selected and set Max Size to Width of 1280 and height of 900
- Set any image enhancement options you want (i.e. sharpening). You might also want to add a watermark (your name, EXIF photo date, IPTC caption, etc.)
- In output settings, choose JPEG with Quality 65. The default output directory is a subdirectory called "proofs" but you can change this to whatever you wish.
- In the Rename section if you enter "%o-email" it will add "-email" to the original filename of the image.
- Click on "Proof Selected" then use Breezebrowser to look at the results in your "Proofs" directory (or wherever you have put them).
In this particular example, the original image was 3504 x 2336 pixels in size with a filesize (as a JPEG) of 2.2 Mb. The resized 1280 x 853 image is 200K (0.200 Mb) in filesize - nice and tiny for emailing yet still perfectly viewable on any computer monitor or TV.
More Options
Do an Internet search (i.e. Google) for "resizing photos for email software" and you'll get lots of hits, including dozens of free software packages designed to resize photos and even some services that will do the conversion on-line.
Android
The same problem exists with smartphones that create high Mp size images (and hence large file sizes). There are many apps that can reduce the file size of an image for emailing. I use a very simple app called "Send Reduced" - all it does is reduce the image size to what you want, allowing for quick and easy emailing or messaging of small size photos.
|