Your location: Rideau Canal Home Page > Ecology of the Rideau > Nature Photography
 The Nature of Wildlife Photography
by Ken W. Watson

Getting eye to eye with nature
A few tips and tricks to taking better wildlife photos
The different between a professional wildlife photographer and a good amateur is essentially money. A professional has the equipment (many thousands $$) and time to get those great shots. But there is no reason that you can’t emulate the general techniques that the professional uses and come up with some great pictures of your own. Of note, I’m not a professional, my photos are taken with consumer grade cameras and most of my photos are taken on general outings (hiking, bicycling, boating) which offer chance encounters with wildlife. These tips are geared towards this type of equipment and outings.
The following are a few hints and tips to get some great photos.
Type of Camera
Almost everyone today carries a camera given that a camera is an integral part of a smartphone. While this article is more directed towards cameras that can use interchangable lenses, have full control over shutter speed and f-stops and can take filters (i.e. polarizer), all the general principles apply to any camera. Capabilities of a smartphone are both its inherent capabilities (type of lenses, sensors) and the camera app that is being used. The native camera app on your smartphone might be great, but if not, it's worth checking out other apps that may make better use of your phone's photographic capabilities.
1) Know general photographic principles - Take a photo course or teach yourself photographic basics. These basics would include how the aperture (f-stop), shutter speed and ISO (“film” speed) relate to each other and how they affect your photos. Be familiar with the basis “rule of thirds.” I won't discuss these here, I'll assume you have some familiarity with basic photographic principles.
2) Have the camera ready - I have a very long list of wildlife photos that I've missed because the camera hasn't been ready to go. The “just hold on while I unpack my camera, turn it on and focus” doesn't work with most animals. Have the camera around your neck, ready to go. If you're buying a new digital camera, a feature to look for is the shooting delay, the time between turning the camera on and being able to take a photo. With my current camera this is virtually instant, but with my previous digital it was almost seven seconds (and I watched lots of wildlife leave the scene while the camera was powering up).
3) Check your camera – Before you head out, turn your camera on and check its settings (shooting mode, ISO, exposure compensation). I've blown shots because the camera was left on its last settings and I didn't pay attention to them the next day. In fact it’s a good habit to check your settings each time you use the camera. Check the charge on your batteries (and carry spares) and make sure your memory cards have been erased and are ready for a full day of photography.
4) Be observant – this might be self evident, but most wildlife generally prefers to be hidden. Scan ahead of you. Humans generally have good eyes and ears – use these to note animals before they note you. Once you've spotted something of interest, approach slowly, camera ready. Take photos as you approach (so at least you have something if the animal runs away).
5) Be aware of your appearance to the animal - Are you approaching from upwind or downwind? Most animals use their noses and will want to smell you. It is a great advantage if you are approaching from downwind – it often allows you to get closer to wildlife. Speed is also a factor. For instance in my kayak if I paddle in towards a sunning turtle, it will bail into the water long before I can get a good photo. But if I drift very slowly (emulating a drifting log) and don't move my body I can get almost on top of the turtle. Many animals have eyes that are very sensitive to movement (and insensitive to non-movement or very slow movement). So move very slowly and gently.
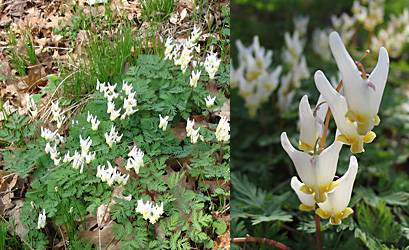 |
| Photos of Dutchman's Breeches - the left is the view most people see, the right is a much more dramatic and interesting close up. Also note the effect of a low depth of field in the right photo that makes the flowers stand out (see section 11) |
6) Be close but be respectful – the best wildlife photos are those where the subject fills most of the frame. People like to see the detail on the plant or animal. With animals the trick is not to encroach into their space, particularly where things like young are involved (bird chicks, etc.). Hence the need in this case for a telephoto lens, allowing you to get a close view of the animal while maintaining a respectful distance. Professional photographer use large, very expensive telephoto lenses. My advice is to buy what you can afford. With a point & shoot (P&S) camera, look for the optical x factor (ignore any digital zoom numbers, they are meaningless). Most cameras come with a 3x or 4x optical zoom. But some come with an 8x or 10x zoom. If you are doing lots of wildlife photography, look for these higher zooms. Note that most P&S cameras, the x factor starts off at about 35 mm – so a 4x optical zoom is equivalent to a 140 mm telephoto lens, an 8x equivalent to a 280 mm lens.
If you have an SLR, then get as large a telephoto lens, usually a zoom for flexibility, as you can afford. Most digital SLR have a multiplication factor on the lens size because of their sensors are smaller than 35mm film. In the case of my SLR it is a multiplier of 1.6, so when I put my 300 mm telephoto on the camera I end up having the 35 mm equivalent of a 480 mm lens. With both P&S cameras and SLRs, optical stabilization of the lens is also a very good feature (see “Be Steady).
The flip size of getting close is with small objects such as flowers and insects. In this case the feature you want to look for is the lens’ macro capabilities, how close in can you get. Some good macro lenses will focus within a few inches of the subject, allowing you to fill the field of view with a small object.
7) Be Steady – the reason most wildlife shots don't turn out is the fact that the camera moved during the photo, producing a bit of blurring or fuzziness to the photo. Many people blame this on the camera or lens, but it is almost always the photographer who is to blame. With a telephoto lens, the general rule of thumb is that you must have a shutter speed equivalent to the lens length to produce a vibration free shot. If my lens is set to 480 mm, then by this rule I should have my shutter speed at 1/500 second or faster. An optically stabilized lens can generally add about 2 f-stops of steadiness, in the above example it would allow me to take the same vibration free shot at 1/125 second.
In the ideal world, every shot would be taken on a tripod using a remote shutter release (since the act of pressing the shutter button also induces vibration into the camera). In the real world this is usually not possible. I've yet to figure out how to use a tripod from a kayak, so all those shots are hand held. While hiking or cycling, I carry either a tripod (if I’m really keen) or a monopod. Practise holding the camera steady – think about it during the shot. If the subject is moving (i.e. birds in flight), practise the technique of tracking them (moving the camera at the same speed as the subject)
Some cameras have the ability to adjust shutter speed on the fly. With others you might want to set the camera on it’s “Tv” setting if it offer one. This is the “shutter priority” setting and you can manually set the shutter speed you want and the camera will adjust the aperture.
Boost the ISO (film/sensor sensitivity) if you absolutely need to. With some cameras this will add noise to the photo, so test the camera first. Most cameras’ auto setting will use an ISO of about 100. But, for instance, if you have a photo where the best you can do is a shutter speed of 1/125 and you want to boost it to 1/500 (and maintain the same exposure), the adjusting the ISO from 100 to 400 will boost the shutter speed to 1/500. I generally leave the ISO of my camera in the 100 range and only boost it when I absolutely need to.
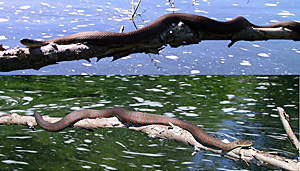 |
| Photos of a Northern Water Snake taken from different angles a few minutes apart - the top photo is into the sun, the bottom photo is with sun at the photographer's back. |
8) Track the sun – the old adage “keep the sun at your back” is still true with modern day photography. Colours are much better if the animal or flower is in sunlight rather than in shadow. Keep this in mind when trip planning. Given that the sun generally rises in the east and sets in the west, try to plan a route where you are travelling in a westerly direction in the morning, northerly towards noon and easterly in the afternoon. It doesn't have to be exact, but if you have a choice try to travel with the sun behind you rather than into the sun. Also the “magic hour” for photography is generally just after sunrise and just before sunset when the sun is low on the horizon. The sunlight is travelling through more atmosphere and this provides a warmer, richer light. But for most, it is only a happy coincidence to be able to do photography restricted to these magic hours – just be aware that early morning or late afternoon are usually the richest most saturated light.
9) A Polarizer is your Friend – a polarizing filter for your camera can make the difference between an okay photo and a stunning photo. A polarizer will remove glare from the subject. It is most dramatic for shots taken on water and of vegetation (flowers and such). It allows the full vibrancy of the colour to come through. All SLR cameras and many point & shoot (that allow a filter adapter) can use a polarizer. Make sure you get a circular polarizer (not the shape of the filter, all of which are circular, but the type of polarization it does – this type allows the light meters on a digital camera to work correctly). The downside of a polarizer is that it will cost you about 1.5 f-stops of exposure and it does add another layer of glass onto your lens. Be sure to purchase a high quality polarizer (don't go cheap) and use with discretion (I don't use it all the time - just for shots where I clearly know that a polarizer will greatly enhance the shot).
10) Think Exposure – many wildlife photos, particularly wildflower photos will benefit from a slight underexposure. In some cases this is crucial, such as a white flower on a dark background. Your camera will try to expose for the whole scene and this will overexpose (blow out) the white in the scene. Often it is hard to exactly judge how much underexposure to do. Professional photographer know this (they aren't much better at judging exact conditions) and will bracket the shot – that is they will take 3 photos in a row, one at the proper exposure, one a certain amount (say 1 f-stop) underexposed and one the same amount overexposed. Then later they can judge what was the best shot. Many better P&S and SLR cameras have this auto-bracketing feature built in. But even if you aren't have it – if the subject permits, take several shots at different exposure settings. You'll soon learn to guess which way you have to go. If you have a dark subject on a light background you'll have to overexposure to get the best shot (i.e. a red fox on snow).
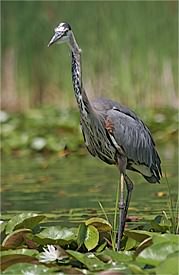 |
| A Great Blue Heron stands out in relief against a low depth of field blurred background - 300 mm lens at f/7. |
11) Think Depth of Field – depth of field is the amount of the photo that appears to be in focus. It is related to the focal length of the lens, the aperture the lens is set to and the distance to the subject. The larger the focal length, the less depth of field the lens provides. With a given lens, the greater the aperture (i.e. f.22 as opposed to f.5.6), the more the depth of field. The distance to the subject will determine the “thickness” of the depth of field. For instance, a 100 mm lens, set at f.5.6, with a focus point at 40 feet, might have 35 to 45 feet in sharp focus. If that same lens is set at f.22 the depth of field might be from 25 to 55 feet. Because of their design, most P&S cameras have a greater depth of field than SLR lenses. With wildlife photography, the usual desire is to have a low depth of field, making the subject stand out in crisp focus against a blurry background (which helps to define the subject). So SLRs are generally better than P&S cameras in this respect. A photographic term for this out of focus enhancement is bokeh, the way a particular lens renders the out of focus part of the image (some lenses produce better bokeh than others). But with any lens, keep depth of field in mind when taking the shot – try multiple shots with different depths of fields and different focus points to see what the effect is.
12) Think Framing – outside of the general rule of thirds (which of course you are familiar with) there are a few other general concepts to think about. If the object is moving (i.e. flying bird) it is often better to put more space in front of the object than behind it (make the object going towards something rather than moving away from something). With small objects (flowers, insects) think “close up” Fill the frame with the subject – it’s the type of detailed view most people don't take the time to see but are fascinated with when they see it in your photo.
13) Think Focus – most cameras autofocus using a best guess technique. This can be difficult if the subject is partially obscured by vegetation or you want to frame off-centre. One trick is to put the subject dead centre, press the shutter halfway down to set exposure and focus, then while still holding down the shutter (to maintain that exposure and focus) reframe the photo and shoot. If it is a really tough autofocus shot (obscured by vegetation) switch to manual focus if you can.
14) Think Shots – a huge advantage of digital photography over film is that you can carry an almost unlimited number of shots - digital memory cards are inexpensive, so carry lots of memory and take lots of shots. As previously noted, a good technique is to auto-bracket your photos (take 3 shots at once with different exposures). With a subject that you know will be in motion (i.e. ducks about to take flight) - set your camera to burst mode if you have it - this will take pictures as fast as the camera can, up to the internal memory limit, as long as you hold down the shutter. So when the ducks take off, you might get 15 or 20 photos of each stage of their takeoff and flight.
15) Think tracking – following on the above (think shots) concept, another great wildlife technique to cultivate is tracking a moving subject. I touched on this in the "keep steady" section, but to elaborate, learn to follow the action of the wildlife with your camera. When you get good at this, drop your shutter speed when doing this technique. What this will do (if done right - and it is tricky) - is to keep the subject in perfect focus while creating motion blur behind the subject - this gives a sense of speed and direction. When used in conjunction with burst mode, it can be very effective to capture that perfect shot of wildlife in motion. Note that some cameras have a special focus mode for this type of action shot (sometimes they will call it a sports focus mode, meant for action sports (it provides continuous, real-time focusing), but it works just as well for wildlife in action).
16) Think Sport – this has nothing to do with photographic techniques but think about the reason you're doing photography. For many (even though they won't admit it) the joy is really the act of photography itself, finding the subject, making the perfect composition, taking the photo. The photo itself is somewhat incidental to the activity. The real bonus as I see it is that photography is a great excuse to get physically active. Hiking, cycling, paddling can all be interesting in themselves, but when you combine those activities with photography they make every trip interesting, a new adventure. Nature photography is best done in person (as opposed to being in a motorized conveyance) so there is inevitably physical activity involved. In my younger days I did mineral exploration in the Yukon. While the work related part of this was doing geological mapping and looking for interesting mineralization, at the end of a 2,000 vertical foot sweat inducing, muscle cramping climb was always a spectacular photo and I lugged the camera everywhere I went. It made the work much more interesting and it will make your outings much more interesting as well. You'll be much more in tune with nature since you'll be looking for wildlife and photo opportunities – you'll see things most other people miss.
17) Post-Process – taking a photo is often only half the job. The other half is post processing, putting your photo into a digital darkroom (photo program). You can enhance shadow detail, improve/correct colour, re-frame and/or crop, sharpen, and much more. If you are really into photography it's worth learning a program such as Adobe Photoshop (a good starter is Photoshop Elements - many technique learned in Elements can be later applied to the full version of Photoshop).
18) Think display – while it is true that for most the real joy is the act of photography itself it is always nice to share your results. I do it with photo galleries on my own website. There are now many free photo gallery websites – do a search for “free photo gallery” and see what you come up with. Most of today’s basic ink jet printers do a wonderful job at printing photos. Set up a wall in your house showcasing your efforts, printing 8.5” x 11” photos right at home.
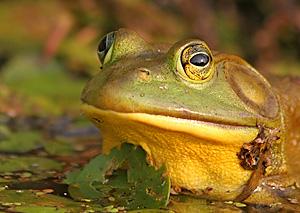 |
| A face only a mother could love |
 | |  |
Comments: send me email: Ken Watson
©1996- Ken W. Watson
|